1:00 AM Quarantine Tank Setup: Step-by-Step Guide for Aquariums | |
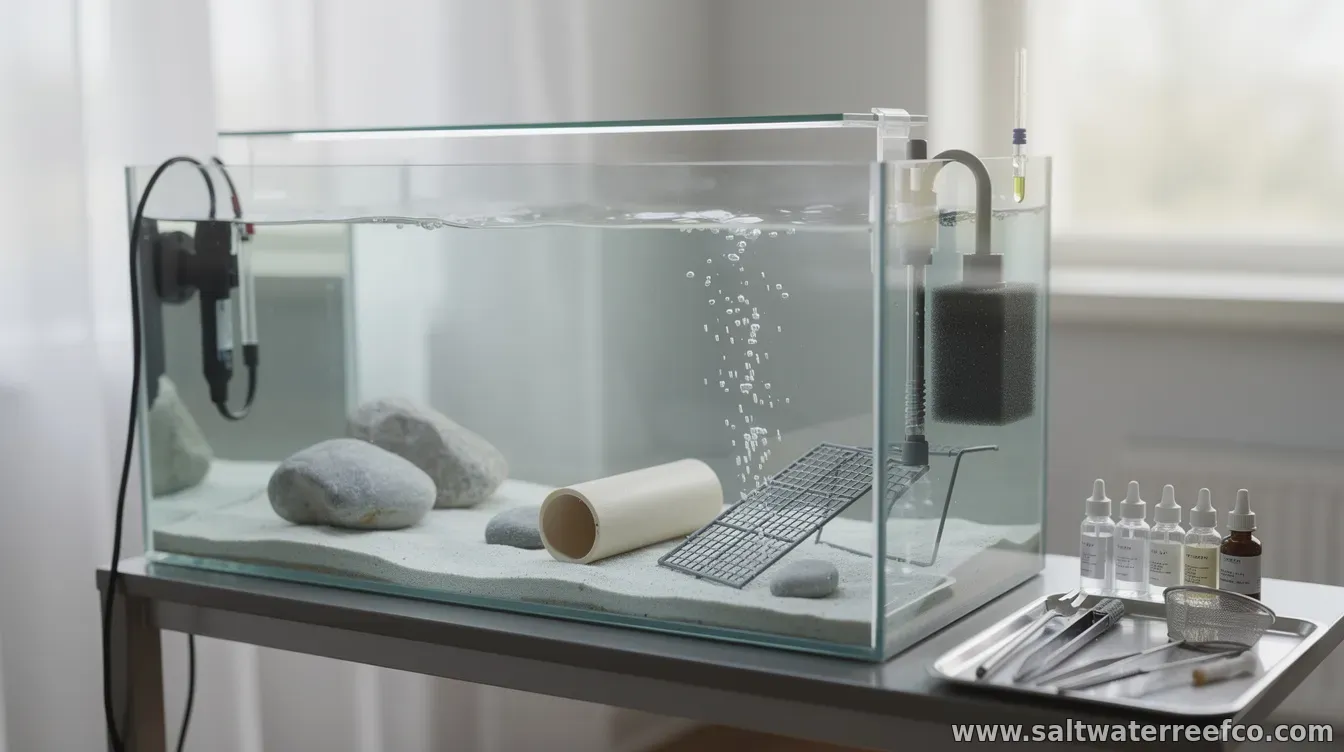
Setting up a quarantine (QT) tank is one of the most reliable ways to protect an established aquarium. While it may look like an extra step, QT gives you a controlled space to watch for disease, isolate new arrivals, and administer treatment without exposing your main tank’s fish, plants, or beneficial microbes. This guide walks through a practical, step-by-step quarantine tank setup, with options depending on whether you’re quarantining fish only or doing more intensive medical observation. 1) Choose the right tank and locationStart with a simple, easy-to-clean container. For most community fish, a small to medium bare-bottom aquarium (commonly 10–20 gallons / 40–75 L, depending on your species and stocking) works well. Place the QT in a stable-temperature area away from direct sunlight and drafts, and ensure you can access it easily for daily monitoring. 2) Use a bare-bottom layoutKeep the substrate simple: bare-bottom is usually best. It’s easier to siphon waste, spot parasites, and disinfect the tank between uses. Add a few hiding spots such as PVC elbows/tubes or inert decorations to reduce stress, but avoid anything porous you can’t fully clean and sanitize. 3) Equip basic life-support: heater, thermometer, and aerationInstall a heater sized for your tank volume and confirm temperature stability with a thermometer. Add aeration or an air stone if your filtration doesn’t create enough surface agitation. During quarantine, stable oxygen and temperature are as important as medication—many outbreaks worsen when water conditions swing. 4) Set up filtration (and decide on a “ready” approach)Filtration depends on your quarantine goal:
Regardless of the approach, avoid transferring equipment from the main tank back into QT without disinfection—cross-contamination is the enemy. 5) Cycle or plan for ammonia controlIdeally, the QT filter should be biologically mature. If you can’t cycle it fully in advance, you’ll need more frequent water testing and partial water changes. Test ammonia and nitrite at least early on, and be prepared to do immediate water changes if levels rise. As a baseline, use dechlorinated water (conditioner appropriate for your system) and keep salinity consistent for marine species. 6) Add water conditioners and establish a maintenance routineBefore fish arrive, confirm temperature and pH/salinity are steady. Use a dechlorinator (and for marine systems, ensure salinity is matched to the acclimation water). Then plan your daily routine: observe behavior, check breathing rate and color, and do targeted water maintenance based on test results. 7) Prepare quarantine supplies before you need themHave a small “QT kit” ready so you can act quickly:
If you anticipate treatment, research the correct medication and dosing for your species and water parameters ahead of time. Using the wrong product or dose can be more harmful than the disease. 8) Stock QT carefully and acclimate safelyA quarantine tank should not be overstocked. Reduce stress during acclimation and avoid dumping transport water into QT. Float bags to match temperature, then gradually add QT water. Observe closely after release—stress in the first 24–48 hours can mask or trigger symptoms. 9) Monitor daily and watch for early signsDuring quarantine, look for changes in appetite, breathing, discoloration, clamped fins, flashing/rubbing, white spots, or unusual stringy feces. Remove uneaten food promptly to reduce waste. If you see symptoms, treat the problem based on the most likely cause—don’t assume every spot is the same parasite. 10) Maintain “clean QT” between usesAt the end of a quarantine period (or if a disease forces a restart), fully clean the QT. Dispose of sponge filters and media if a serious outbreak occurred, and disinfect surfaces as appropriate. Keep QT equipment separate from the main tank to prevent recurring introductions of pathogens. Quarantine duration note: A common guideline is several weeks, but the exact length depends on fish species, how severe symptoms are, and whether you’re treating. When unsure, err on the longer side and base decisions on observed health and testing. With the right setup—stable temperature, dedicated equipment, reliable filtration, and consistent monitoring—a quarantine tank becomes a low-risk insurance policy for your aquarium. If you tell me your tank size (freshwater or marine), fish species, and whether you plan to treat with medication, I can tailor the setup and maintenance schedule to your situation. | |
|
| |
| Total comments: 0 | |